How to create an Angular Pipeline with Jenkins
In this article, you’re going to see how to set up Jenkins from scratch and create and run an Angular pipeline — all in about five minutes. Don’t worry if you’re not familiar with Angular. The same principles hold for Vue, React, Python, Java, and other languages. So get comfy because we’re about to start.

The structure of the article will be as follows:
- Setting up Jenkins
- Creating a Jenkinsfile
- Creating a pipeline
Setting Up Jenkins
If you’re already familiar with Jenkins, feel free to skip this part.
In this section, we’ll go over the installation steps for macOS and Linux as shown on the Jenkins website. You can also find information on getting started on a Windows machine.
First, let’s create a network for Jenkins:
docker network create jenkins
Add two volumes to share Docker client TLS certificates and persist Jenkins data. This way, no data is lost when you shut down your PC or server, for example. Keep in mind that if you do remove these volumes, data will be lost permanently.
docker volume create jenkins-docker-certs
docker volume create jenkins-data
The following four commands bring the Docker container up:
docker image pull docker:dind
docker container run --name jenkins-docker \
  --restart unless-stopped \
  --detach \
  --privileged --network jenkins \
  --network-alias docker \
  --env DOCKER_TLS_CERTDIR=/certs \
  --volume jenkins-docker-certs:/certs/client \
  --volume jenkins-data:/var/jenkins_home \
  --publish 2376:2376\
  docker:dind
docker image pull jenkinsci/blueocean
docker container run --name jenkins-blueocean \
  --restart unless-stopped \
  --detach \
  --network jenkins \
  --env DOCKER_HOST=tcp://docker:2376 \
  --env DOCKER_CERT_PATH=/certs/client \
  --env DOCKER_TLS_VERIFY=1 \
  --volume jenkins-data:/var/jenkins_home \
  --volume jenkins-docker-certs:/certs/client:ro \
  --publish 8080:8080 \
  --publish 50000:50000 \
jenkinsci/blueocean
Jenkins is now running on http://localhost:8080, but you have to do one more tricky step: You have to unlock Jenkins. The initial password can be found inside a folder of the Jenkins CI blue ocean Docker container. I’ll show you how to retrieve this. When you try this yourself, make sure you specify the right docker UUID.
docker container ps
4ec29afb280f        jenkinsci/blueocean
1ce11b131265        docker:dind
docker container exec 4ec29afb280f cat /var/jenkins_home/secrets/initialAdminPassword
bd95aa5131a142b690795fa9427287a8
In the next step, you can configure the plug-ins you want to install. I’ll leave that up to you. I installed the Cobertura (for Java) and Locale plug-ins and got rid of Subversion. After they are installed, you have to create an admin user.
In the last step, you have to set a Jenkins URL (e.g. http://localhost:8080), but I did not bother to change it. In the end, Jenkins restarts and is completely installed. That took us literally only a couple of minutes.

The Jenkins user interface. Pic courtesy: medium.com
Creating a Jenkinsfile
Let’s face it, there are tons of possible ways to define a great pipeline. This will only be a simple example. It would be great to hear if you have suggestions for an improved pipeline. Don’t hesitate to leave a comment at the end of the article!
First of all, it’s important to specify a base Docker image to run our commands. At the time of writing, using the latest node Docker image felt like a good choice.
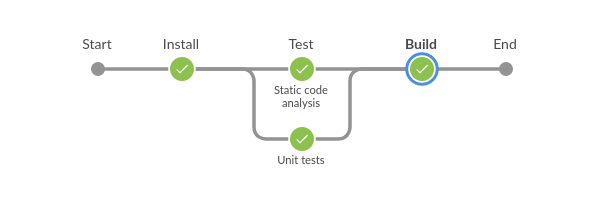
Next, we specify the stages to go over. In this configuration, the most recognizable development stages are specified:
- Install — To make sure we got every dependency installed without errors.
- Testing — Listing, unit tests. For this, we define two stages that can run in parallel. Feel free to add integration or end-to-end tests if you have that need.
- Build — Finally, there is still the possibility that our build fails. This is the last step before deploying the application.
Feel free to add additional steps. At this point, you have so much freedom. Deploy automatically or publish a Docker image that can be rolled out to a limited amount of users. That choice is yours. To conclude this section, let me share the pipeline with you. Put this inside a Jenkinsfile (no extension) in the root folder of your project:
pipeline {
  agent {
    docker { image 'node:latest' }
  }
  stages {
    stage('Install') {
      steps { sh 'npm install' }
    }

    stage('Test') {
      parallel {
        stage('Static code analysis') {
            steps { sh 'npm run-script lint' }
        }
        stage('Unit tests') {
            steps { sh 'npm run-script test' }
        }
      }
    }

    stage('Build') {
      steps { sh 'npm run-script build' }
    }
  }
}
Creating a Pipeline
Open Jenkins on http://localhost:8080 and create a new item. No need to do a lot here, actually. Let’s create a “Multibranch Pipeline.”

Create a Pipeline menu. Pic courtesy: medium.com
A new menu opens. Here, you can add a description among many other things, but we’ll only cover the most important parts in this article. You should look for the section called “branch sources” and select Git. The next thing to do is pass in a project repository (e.g. https://github.com/user/project-name.git) and your credentials. That is sufficient.
Let’s add one more thing to make it an automatic pipeline. Let’s poll the GitHub repository for changes. Enable “Scan Multibranch Pipeline Triggers” and pass a reasonable interval. This will trigger a build (e.g. every minute) only when there are source code changes. That way, builds get triggered automatically. If one minute is too intensive, you can always lower the interval to check for changes later on.
Now go to http://localhost:8080/blue/organizations/jenkins/pipelines and run your first job if it’s not already running. Let me show you how this looks:

The pipeline was successful! Pic courtesy: medium.com
For more information and to develop web application using Angular, Hire Angular Developer from us as we give you a high-quality product by utilizing all the latest tools and advanced technology. E-mail us any clock at – hello@hkinfosoft.com or Skype us: “hkinfosoft”. To develop web application using Angular, please visit our technology page.
Content Source:
- medium.com


